Wymuszenie instalacji Integration Services Hyper-V dla maszyn niepracujących na Hyper-V / How to Force Installation of Integration Services
Czasami jesteśmy zmuszeni zainstalować, drivery Integration Services Hyper-V na maszynie fizycznej, lub pracującej pod kontrolą innego Hypervisora. Jest to niezbędne jeżeli planujemy migracje maszyn typu Windows Server 2008 do Microsoft Azure lub do Hyper-V. Przyda się takowa instalacja również przy wykorzystywaniu Azure Site Recovery.
- Skąd pozyskać Integration Services?
Plik zawierający oprogramowanie Integration Services znajduje się w pliku vmguest.iso, który znajduje się w katalogu c:\Windows\System32 po instalacji roli Hyper-V w Windows Server 2008,2012 i 2012 R2 (ale nie w 2016!). Oczywiście polecam najnowsze wydanie z Windows Server 2012 R2, jeżeli nie mamy na jakimś serwerze zainstalowanego i zaktualizowanego takiego systemu wraz z Hyper-V nie pozostaje nam nic innego jak wdrożyć taką maszynę wirtualną w Microsoft Azure. Niestety system Windows Server 2012 R2 nie obsługiwał Nested Virtualization, tak więc nawet jak w Azure wybierzemy serie maszyn Dv3 (obsługujących Nested Virtualization) nie będziemy mogli dodać roli Hyper-V poprzez graficzny interface użytkownika. Do tego celu musimy użyć PowerShell i wykonać jako administrator następujące polecenia:
Enable-WindowsOptionalFeature –Online -FeatureName Microsoft-Hyper-V –All -NoRestart
Install-WindowsFeature RSAT-Hyper-V-Tools -IncludeAllSubFeature
Restart-Computer
Po powyższym wystarczy skopiować i rozpakować plik vmguest.iso chociażby przy pomocy oprogramowania 7-zip.
- Jak wymusić instalacje Integration-Services
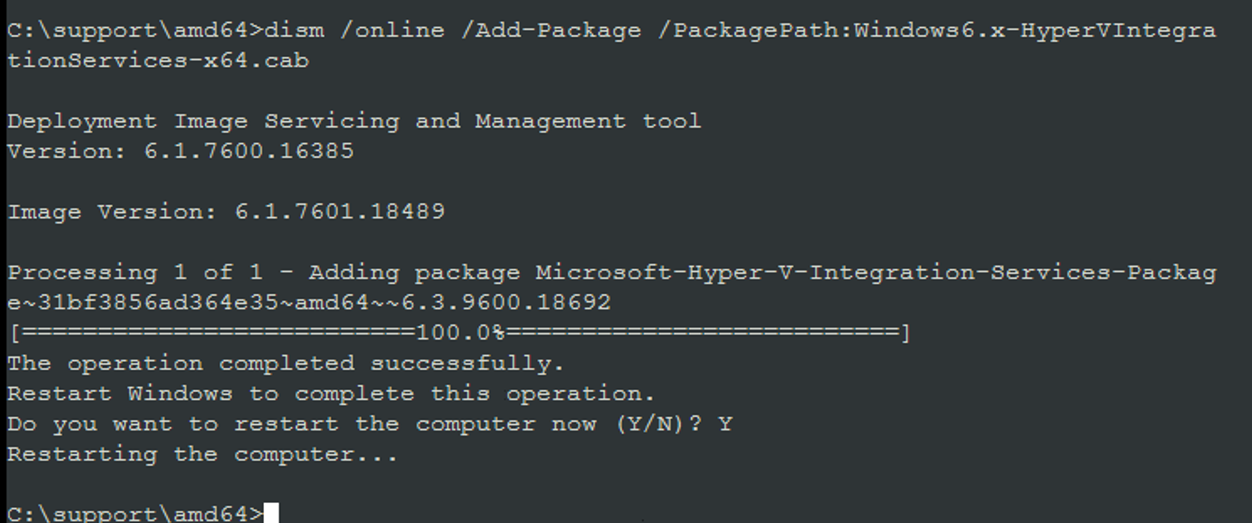
Na maszynie, która nie działa pod kontrolą Hyper-V nie uda nam się zainstalować Integration Services kilkając za pomocą standardowego instalatora, a trzeba użyć oprogramowania dism i wykonać poniższą komendę:
Dism /online /Add-Package /PackagePath:(nazwa pliku .cab do instalacji:
- Windows6.x-HyperVIntegrationServices-x64.cab dla Windows 7, Server 2008 R2 i wcześniejszych
- Windows6.2-HyperVIntegrationServices-x64.cab dla Windows 8 i Server 2012 – późniejsze systemy powinny mieć wbudowane Integration Services Out Of The Box.
Sometimes we have to install Integration Services for Hyper-V on a physical machine, or working under of the another Hypervisor. This is necessary if you plan to migrate Windows Server 2008 machines to Microsoft Azure or to Hyper-V. It will be useful when you are planning using Azure Site Recovery too.
- Where to get Integration Services?
The file containing the Integration Services software is located in the vmguest.iso file, which is located in the c: \ Windows \ System32 directory after installing the Hyper-V role in Windows Server 2008,2012 and 2012 R2 (but not in 2016!). I recommend latest release from Windows Server 2012 R2, if you do not have any of them with Hyper-V installed, I suggest deploy Windows Server 2012 R2 in Microsoft Azure. Unfortunately it do not support Nested Virtualization, so even if you choose a series of Dv3 machines (supporting Nested Virtualization) in Azure, you will not be able to add the Hyper-V role via GUI. To do this, please use PowerShell and perform the following commands as an administrator:
Enable-WindowsOptionalFeature -Online -FeatureName Microsoft-Hyper-V -All -NoRestart
Install-WindowsFeature RSAT-Hyper-V-Tools -IncludeAllSubFeature
Restart-Computer
After that, just copy and unpack the vmguest.iso file, you can use 7-zip for it.
- How to force installation Integration-Services?
On a machine that is not working under Hyper-V control, we will not be able to install Integration Services by using a standard installer, and we have to use the dism program and run the following command:
Dism / online / Add-Package / PackagePath: (name of the .cab file to be installed):
- Windows6.x-HyperVIntegrationServices-x64.cab for Windows 7, Server 2008 R2 and earlier
- Windows6.2-HyperVIntegrationServices-x64.cab for Windows 8 and Server 2012 – later systems should have built-in Integration Services Out Of The Box.